While a lot of people talk about tinctures these days, it shouldn’t be overlooked that people once made wines and ciders with a wider variety of ingredients than they do today, and they were sometimes used for medicinal purposes. I am happy to see that coming back. Wines used to have little extras tucked in that were considered beneficial when taken every day.
“In countries which for their common drinks use wine and water, they always do mingle things for the sight with wine, and not in water. (Wine is in truth a fitter liquor to receive the quality and carry the same to the eyes) which things they do put in the must and so let stand until the wine be ripe and ready to be drank and then so use it.”[i]
When you start looking at the receipts from our manuscript receipt books you are going to find many receipts that don’t mention much about safety measures like this one:
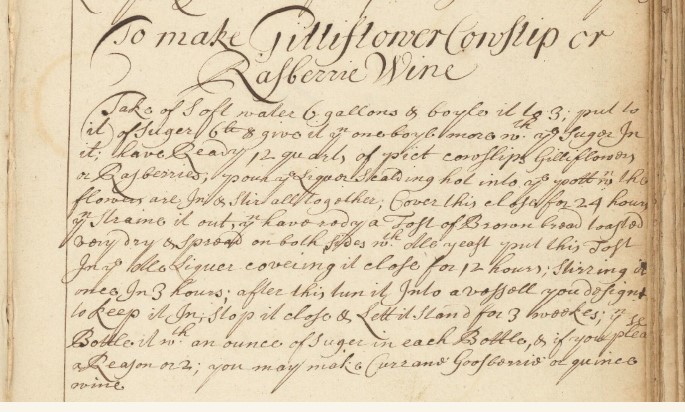
I am telling you now, that’s because whoever was doing the work had been taught that part of the process since they were kids. I was probably ten years old when I learned that you had to push the lees under the must once a day.
Conversely, a lot of modern instructions will tell you to use Campden tablets and a lot of other chemical additive nonsense that you really don’t need. It especially bothers me to see recipes full of chemical additives on websites dedicated to historical recreation.
It is entirely possible to avoid many chemicals and still safely make good wine if you know a little bit about plant chemistry and a bit about food history. First, you will need some sanitized equipment.
Equipment
- Stainless Steel or Enamel Pot for making simple syrup. You don’t need a huge one. You can always make a couple of batches.
- Brewing Bucket – Food Grade plastic bucket or glass that is at least twice the size of the batch of wine you are making. When you start out you can just get yourself a five-gallon bottling bucket and use it for the primary ferment, too.
- Racking Cane – This is how you transfer your wine from container to container without oxidizing it.
- 2 1-gallon demijohns with lids. You can buy rubber stopper bungs, but our brewing store sells screw top lids with holes for the airlock, which I prefer.
- 2 -Airlocks
- Bottles – I use flip-top bottles that we buy for the sparkling lemonade. You can save wine bottles and buy a corker if that interests you. Some people just save screw-top wine bottles and re-use them. My point here is that one of the reasons we brew is to reduce our waste, I am not going to go out and buy expensive bottles just to be period.
- Hydrometer – I suppose you can get by without one but see my story about the exploding bottle.
The first step of good vinting or brewing is using sterile equipment. I have a sanitizing program on my dishwasher, and I wash my equipment and brushes on that cycle. Then, I soak everything that touches my wine in sanitizing solution. B-Brite is an oxygen-based product that doesn’t leave a film like bleach does.
While it’s true that your ancestors didn’t sanitize everything, it’s possible medieval ale and wine were sometimes not amazing. It’s also possible that they left some steps out of their receipts because they were such common knowledge. Either way, I am aiming for amazing, and not making people sick. I see things online that make me cringe because the shortcuts are going to lead to some nasty, skunky, homemade beverages.
We also keep our bigger brewing/vinting equipment in my classroom and away from the kitchen. When it’s time to use it, we carefully wash the glass jars or buckets and then fill them with sanitizing solution.
While this is mostly to ensure safety, it also keeps organisms that might produce off-flavors out of your final product. If you want to brew grossness in pursuit of being authentic, feel free to skip these steps.
About My Additives
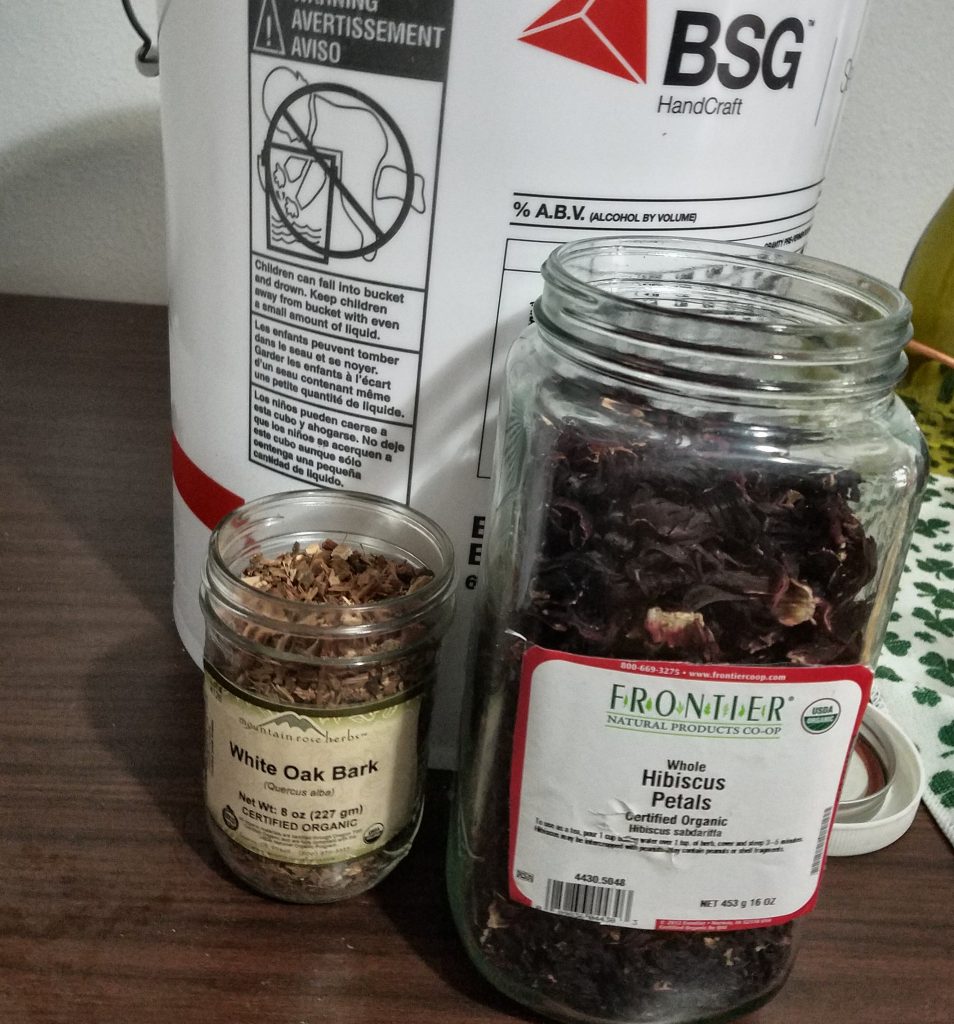
Hibiscus flower infusions contain somewhere between 15-30% organic acids including malic acid, citric acid, and tartaric acid. Those will sound familiar to a winemaker because they are common wine acidifiers. I added them to this wine because plums are a low-acid fruit. It adds a little tang and some nice color.
Tannins leached from oak barrels improve the quality of wines and whiskey, however making oak barrels is not a very sustainable practice these days. Eco-conscious Europeans have countered this problem by adding oak bark chips or other tannins to wine during the secondary ferment and I am happy to follow suit.
I also suggest investing in good wine yeast. I know that it is hipster to catch the wild yeasts, but I can’t quite bring myself to take that crapshoot with my expensive ingredients. The process that I use to make wine involves sterilizing the fruit with boiling syrup and it is going to kill anything that might be hanging about on the fruit, anyway.
Finally! The Receipt
8 lbs. frozen plums
1/3 cup hibiscus flowers
1 tsp. white oak bark
2 gallons of filtered water (chlorine may kill your yeast beasties)
4 lbs. organic, fair-trade sugar
1 package Lalvin 71B-1122 wine yeast
Wash your fruit. Pit it if necessary and freeze it solidly. (I know freezing is not period, but it I have to do it. I have so many cultures going in my house, that I have to make sure the fruit is sterile.) I like to let it hang out in the freezer for at least 48 hours.
Bring your water and sugar to a boil and simmer it until the sugar dissolves. After this, put your frozen fruit and hibiscus in a food-grade brewing bucket that’s at least four gallons.

Pour the boiling syrup over the fruit. I pour just enough over the fruit cover it and mash it with a potato masher. Then I add the rest of the syrup, cover the container, and let it sit overnight.
The next morning you add your wine yeast. For fruit wines, I use Norbonne yeast[i] (Lalvin 71B-11-22, Saccharomyces cerevisiae) which is a strain able to metabolize malic acid which will mellow any acidity. It’s not as aggressive as the yeasts I use for mead. It will only tolerate up to 14% alcohol which is enough for table wine.
This particular yeast needs to be rehydrated. Directions for that are on the package. It’s used for white wines or rosés, which means I end up with a semi-dry product with a nice fruit flavor because it is known for enhancing them.
If I were only using juice to make this wine, this is the point at which I would use my hydrometer to measure the specific gravity so I would know when to switch from primary to secondary fermentation (usually when it drops just below 1.030) and I do admit that I checked this just to stay in the habit.
Once you learn a little more about specific gravity, you will figure out that you can use the hydrometer to fiddle with the final alcohol content of your wine, a bit. But this is Winemaking 101, so we won’t go there. (Yes, I could make this more difficult).
Primary Ferment
Within the first 24 hours or so, the liquid part (called the must) will bubble a bit, and the fruit (called the lees) rises to form a sort of cap on the top of your must. You want to carefully push the lees down into the must once daily. Don’t stir or agitate too much. just lightly push the fruit below the surface and then let it float back up on its own.
Because you are using fruit, you really don’t want the must sitting in fruit for much more than about five to seven days. The fruit will eventually start to decay, and you risk getting some nasty flavors. I could just tell by a change in the smell that it was time to move this wine today, even though it was only six days in the primary.
You will want to carefully skim the lees from your must and squeeze the excess liquid back into the bucket. I do this by slowly ladling the fruit into buttermuslin and squeezing it with medium pressure into the bucket. If you squeeze too tightly, you get lots of bits.
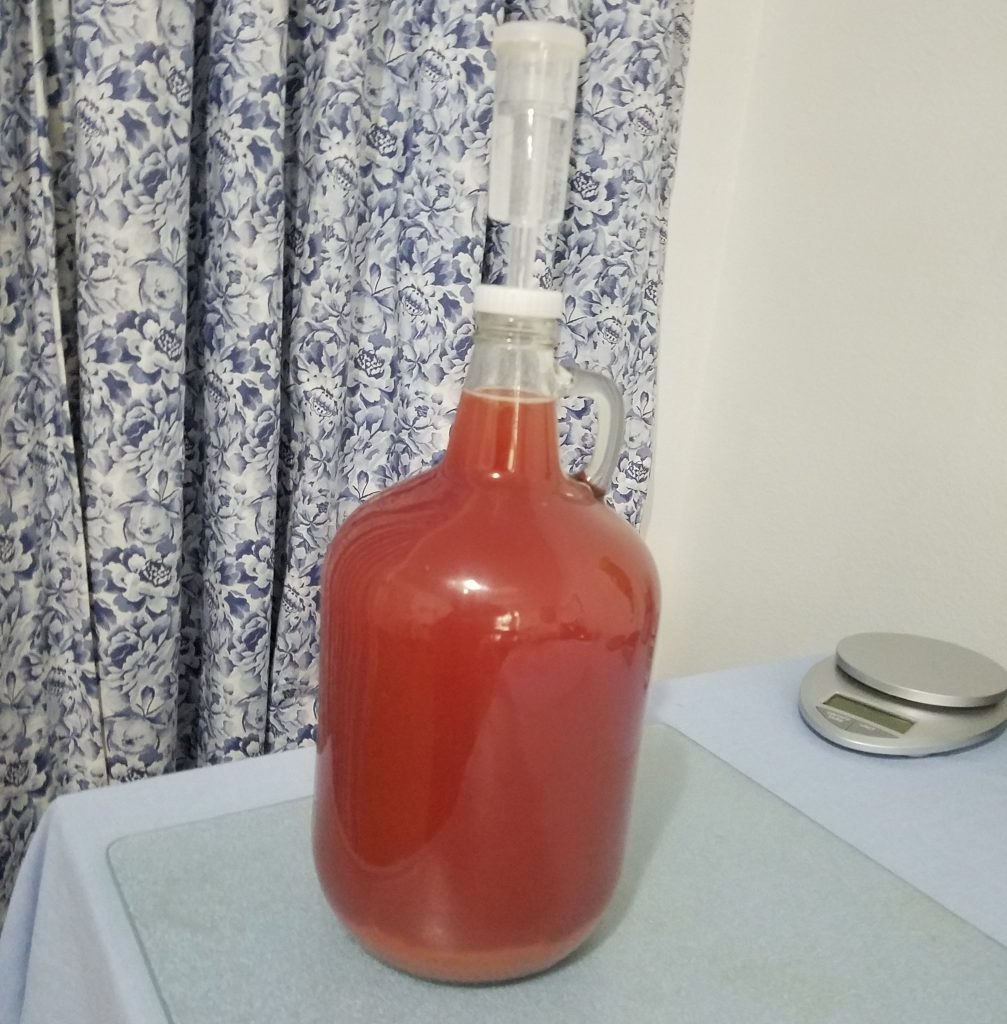
Then rack your wine into your glass demijohns and put an airlock on them. The purpose of using the racking cane is that it reduces your chances of oxidizing your wine.
Clarifying During the Secondary Ferment
The wine is now in its secondary ferment. This is when it will finish clarifying, don’t expect it to be clear at first. During the secondary ferment, the yeast still living in the must complete their life cycle and will settle to the bottom along with any sediment.
Winemakers who lived in the days before chemical additives had all sorts of tricks for improving the quality of the wine. For example, they might clarify their wine by adding egg whites because the albumen in egg whites binds with free proteins suspended in the wine and causes them to precipitate out of the solution. This precipitate was racked off during bottling. This process called fining can cut back on bitterness or astringency and is most often done with wines made with grapes. Our fruit wines have fewer tannins.
The usual treatment is 3 egg whites per gallon of wine. To work this treatment, you want to whisk the egg white in a small bowl, add a teaspoon of salt to inhibit bacterial growth, and a cup of your wine. Then add it to your secondary ferment for the last week before racking.
Winemakers would also add a copper coin to the must to remove free sulfur. Sulfur can cause funky odors and flavors and is the source of naturally occurring sulfites in wine. Modern winemakers have simplified this process by adding copper sulfate to bind free sulfurs.
I am not going to do that. I also don’t propose using a dirty old penny, I have a strip of copper that I bought from a science supply lab that I put in a bottling bucket which I am able to clean well and sterilize in between uses.
Another way to make sure the wine is clear is to rack your wine back into your brewing/bottling bucket and bottle it using a bottle filler attachment. Again, doing this reduces your chances of oxidizing your wine, but at the same time, it helps with degassing the wine before you bottle it.
Bottling
Your wine is ready to bottle when it stops fermenting. You will know this because the specific gravity of your wine will stop dropping. If you take a hydrometer reading on the first day of the third week and the first day of the fourth week and they are the same, you can bottle it. If not, wait.
Some beginner recipes don’t talk about hydrometers and will tell you just to wait a month, and then bottle, but we have gone through the scare of having a bottle blow up. Thanks be to all that is green, no one was in that room. They could have been killed. I no longer trust that method and am quite happy to take the hydrometer readings.
How long you let it cure in the bottle is up to you. The minimum is one month. Ideally, you let it sit for three-six months in a cool, dry place.

[i] (You can also use Vintner’s Harvest VR21. For low-acid fruits or making cider, you can use Lalvin KIV-1116 which is a competitive yeast that fights off wild yeast colonies that can some funky flavors to your wine.)
References:
[i] Baley, Walter. A Briefe Treatise Touching the Preservation of the Eie Sight Consisting Partly in Good Order of Diet, and Partly in vse of Medicines., 1602

You must be logged in to post a comment.